ST&D: all together now

Yup, the quilt’s assembled.

Getting over the hump of those two big joining seams is always my least favourite bit. It’s such a sweat wrangling them through the sewing machine three times: first to attach the front and back sashing on one piece, then to attach the front sashing to the other piece, and finally to stitch down the sashing flap on the opposite side on the back. But now it’s done.

I have the label made and the binding cut – I just need to join all the pieces, press it in half and then start stitching it down. Once that’s done, I have a couple of days of lap-work, hand hemming the binding down on the reverse of the quilt and sewing the label onto the back. Good job it’s cooler just now.

At one point I thought I had all the time in the world to get Signed, Tealed & Delivered done; everyone got their blocks in really early, and I made a good start. And then the Dratted Knee. Still, by virtue of doing a little bit every day and just plugging along, it’ll be ready in good time.

I want to say thank you everyone who has participated, both those who have contributed from the very first quilt and new sewing friends. This quilt has turned out better than I could have dreamed, and that’s down to you. OCA are very excited about getting this one for their silent auction at the May fundraiser.

I’ll post again once the quilt is done, so you can see the final product.

ST&D: Two thirds assembled

I have the top two thirds done.

As usual, I’m assembling the blocks in sections and joining those, which gives fewer huge seams than doing it row by row. The quilt’s 5 blocks across by 6 down, so I do a 4 block and 6 block section on each third, join those and then I only have 2 very long seams to do instead of 5, a definite bonus. I stagger the seams so the first third has a 4 block on the left and a 6 on the right, the second section has a 6 block on the left and a 4 on the right, and so on. I don’t know for sure if this makes a difference, but I thought it seemed a good idea.

So, one more third left to do, and then I can stitch on the binding, make the label, apply that, and hand hem the binding down. Not too long to go, and I’m definitely going to make the deadline 🙂 I’m liking the teal sashing on this one, rather than cream. What do you think?  It’s a pretty feathery print, with a tiny touch of warm pink which doesn’t show up at all in the photo.

The knee’s recovering a lot faster than I feared. It’s painful, sure, but not as disabling as I thought it might be. Certainly not enough to stop me sewing completely, although I do have to ration my time at the machine or I come to after an intense session with the knee stiff and yelling loudly at me.

Onwards and upwards…

ST&D: 60% quilted

Another two rows done.

This particular quilting design does get easier as you go along. You realise that actually it’s not really necessary to mark up this design on your block top. You learn the time intervals at which you move the block from side to side to get the wavy line fairly even. You realise that very dense appliqué or piecing should not be closely quilted or it will stiffen, so you open the lines out in these areas. You learn – quickly – that it’s a really good idea to clip your starting threads (assuming you don’t use leaders and enders, I don’t) because otherwise the sewing machine will pounce on them and chew them enthusiastically at the start of the next line. You get in the habit of placing a pin in the starting edge of the block to indicate whether the wavy lines are horizontal or vertical for this particular piece’s place in the layout, so that the chequerboard effect is consistent and you don’t get three verticals in a row. And you give your walking foot some love. Clean out the matted fluff, wipe off any spray-baste residue, give it a good dusting.

Past the halfway point now, just two more rows to go. Signed, Tealed & Delivered is going to be sashed in teal on the front and cream on the back, just because. All cream is a bit dull to work with. I found some very pretty fabric for the front sashing, and it’ll make a nice change.

A bit of mindless quilting has been just what I need as a break from marketing strategy and copywriting. Sadly, it’s time to get back to all that. I have an entire website to edit and rewrite.

Anyone would think I was getting paid for it…

ST&D: Lush!

I have four more blocks quilted.

I confess, I was a bit nervous about this one. I wasn’t sure how the Aida fabric would quilt up, compared with the softer quilting cotton fabrics. I was terrified of mucking it up, so I made a sample using the same fabric and quilted that. It seemed to be OK. There were a few small tracking marks where the new walking foot’s feed dogs had gripped onto the surface, but I though the result was pretty good. So I took a deep breath and got going.

It’s lovely. The firmer fabric hasn’t stopped the texture forming, and there’s a gorgeous soft ripple which catches the light beautifully. It’s a really nice contrast with the slightly nubbly texture of the background and stitching. I’m so pleased with it!

Thanks, Margaret, your beautiful embroidery is a real asset to the quilt 🙂

ST&D 31: let the quilting commence!

It’s been a whole lot too long since I worked on this quilt.

Remember this? Yup, Signed, Tealed & Delivered, the Ovarian Cancer auction quilt that’s due in 2 months. Eeek!

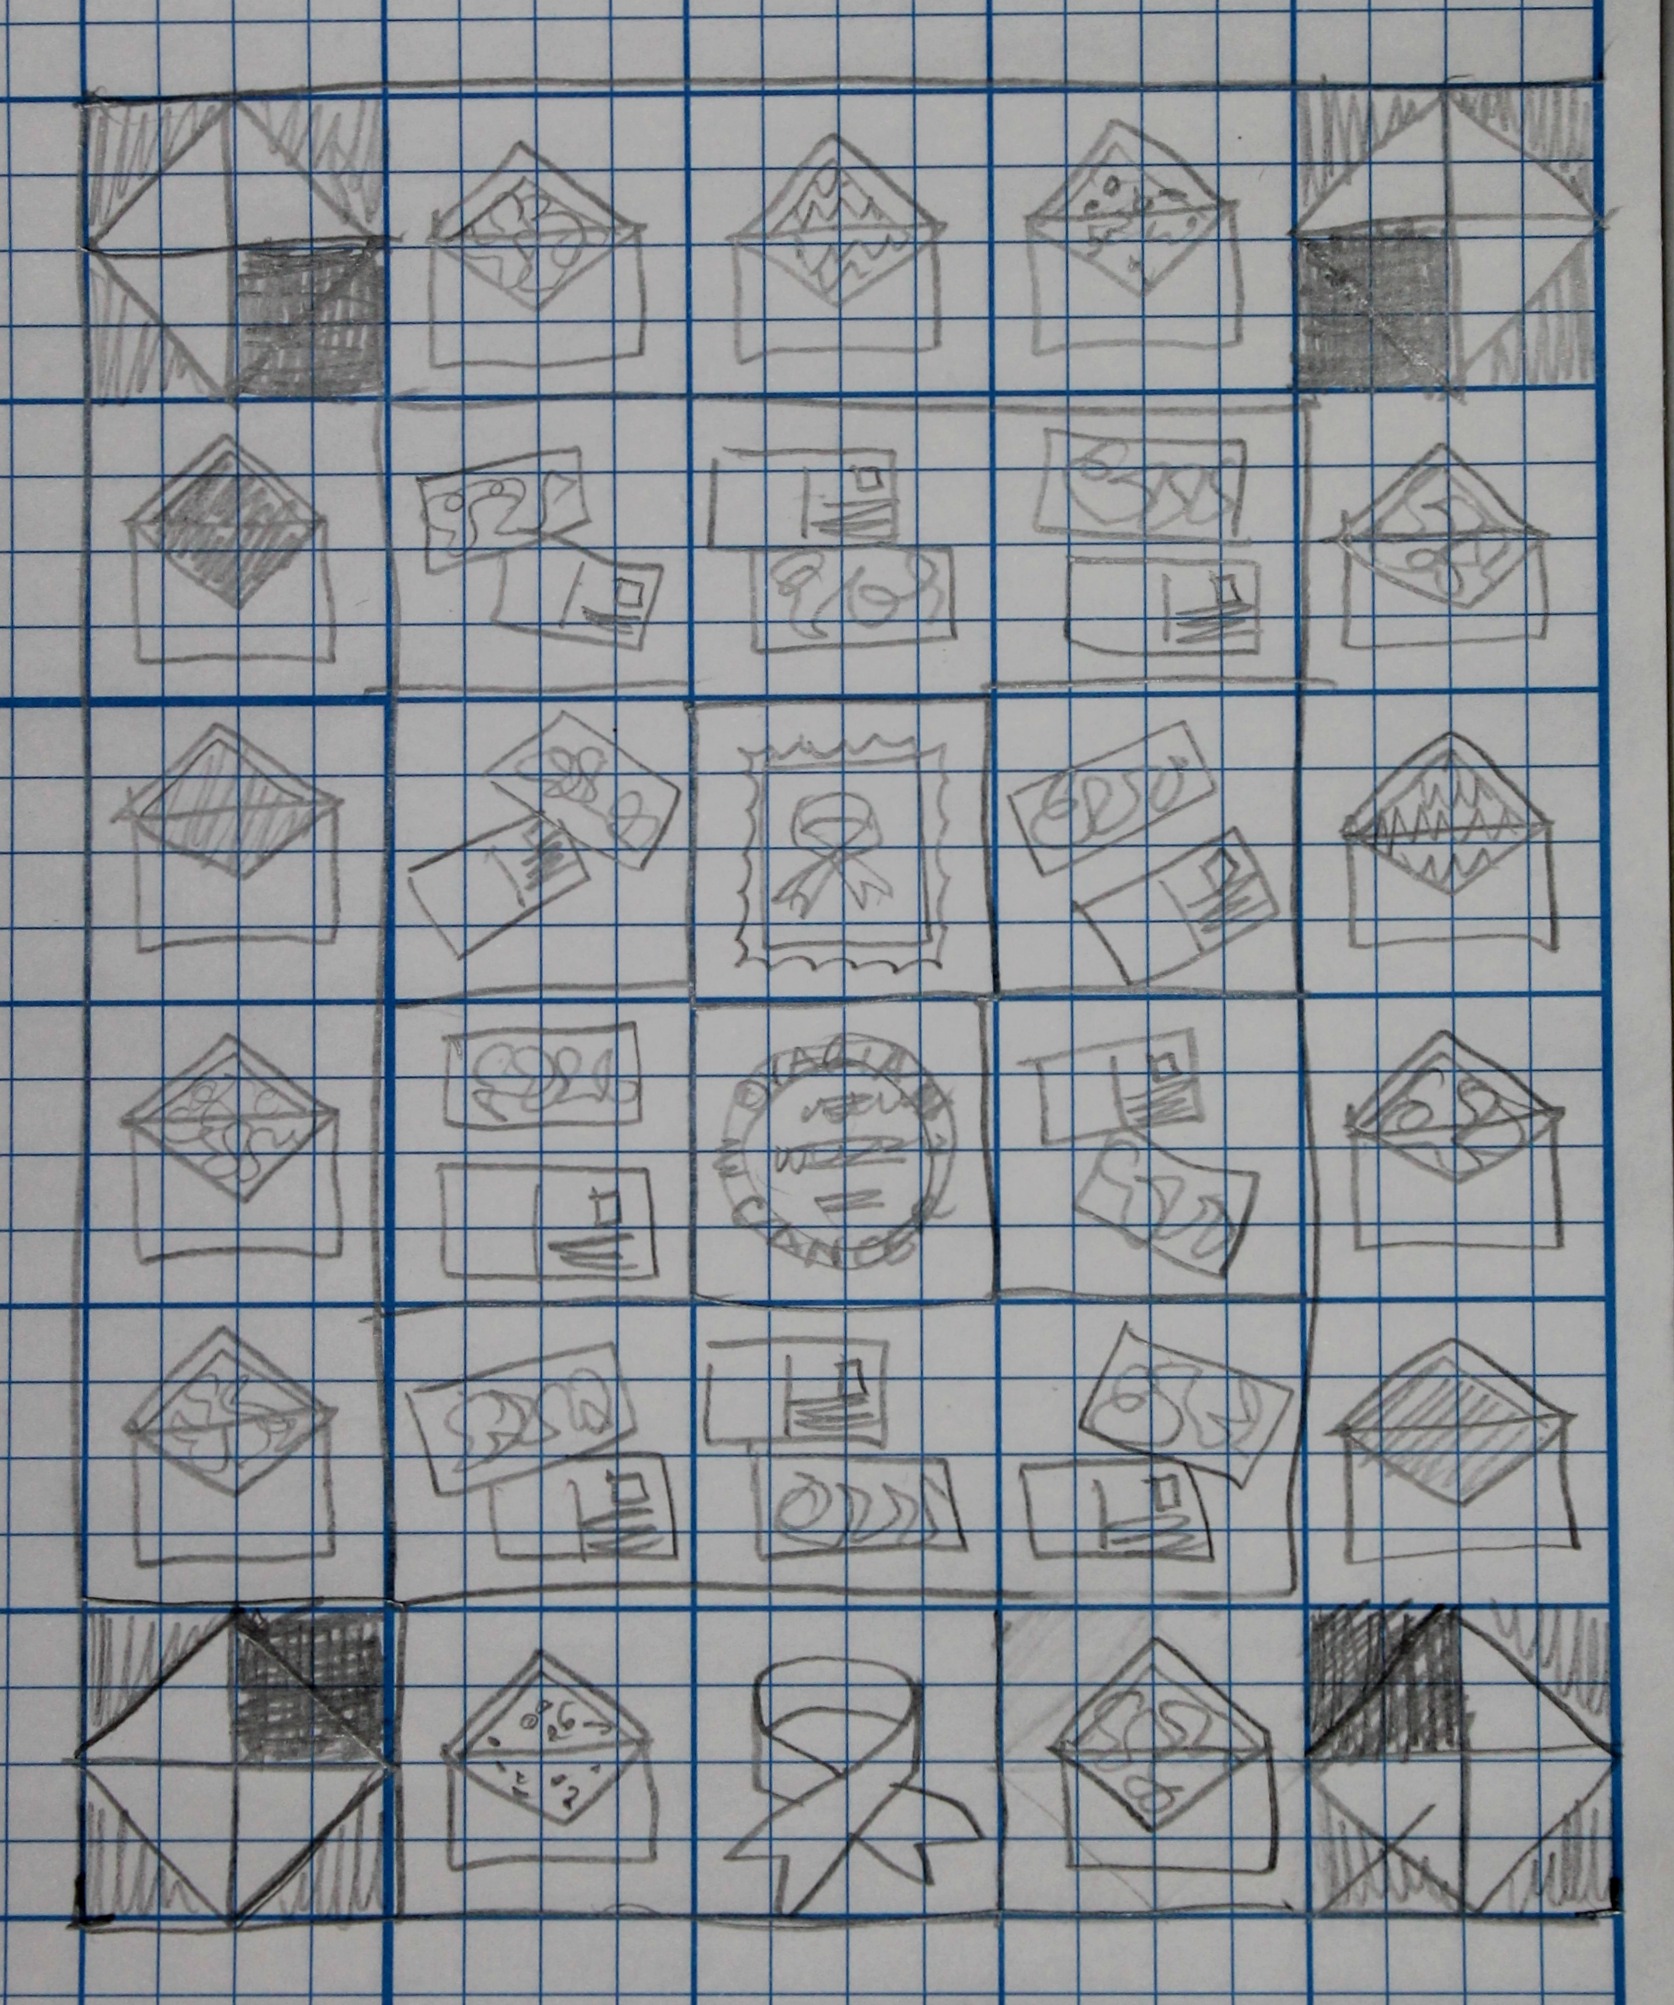
I’ve swapped things around a little since this photo, but you get the idea…

Since my last post about this quilt, when I showed the final blocks from Margaret, I’ve neglected Signed, Tealed & Delivered dreadfully. Porch curtains, holidays, hand quilting Bonnard and the Hatbox quilt, needle-point, weather and holiday reports, you name it and I used it as an excuse. Time to buckle down and get on with it.

Behind the scenes, I did cut enough batting squares for the first (top) row. I also cut squares from what I had left of the airmail sticker fabric and the striped airmail-edging fabric I’m using for the binding. There was never going to be enough of these to do the whole back, so I also got some nice dark cream fabric with Xs and Os on it (representing hugs and kisses, of course!), as I thought this was a good ‘sign off’ for a quilt with a postal theme. I cut the remaining squares from this.

Then came the first dilemma. How was I going to combine these fabrics for the backing? When you use all one fabric, it’s just not an issue. I tried probably half a dozen layouts, and when you’re climbing up and down stepladders with a mouthful of pins and a handful of squares, that particular exercise gets old quickly. Finally, I made a central squared ‘O’, with airmail stickers at each corner and airmail stripe for the rest of the shape. Filling the centre and round the outside were squares of the XO cream. Enough already! It’s the back of the quilt, after all… It all took far too long, and next time I won’t torture myself with fabric choices, the back will be all the same 🙂

Then the quilting dilemma: I’d originally intended to quilt each block with an individual design, but looking at each block and assessing what that would entail in terms of designing, marking and quilting each one made me think again.

I realised that the postal theme was all about straight edges and angles: paper, envelopes, stamps and labels were all straight-edged, with angled envelope flaps. The postcard blocks were also angular. I wanted something texturally soft, to contrast with this.

So I’ve gone with parallel wavy line quilting, an all over design which softens the visual effect and gives a nice rippled hand feel. I’m alternating the direction in which it flows on each block. It has the extra benefit of being nice and quick to do, and requires no marking up, hallelujah!

I’d originally though of cross-hatching, but I didn’t like the way the lines would fight with the lines of some of the block designs. Plus, you know, lots of marking up…?

Recently I saw a Craftsy video called ‘Next Steps with your Walking Foot’ by Jaquie Gering on the subject of walking foot quilting. Most of it is stuff I already know and do, but I was interested in what she had to say about preparing your quilt or block before quilting. Historically, she hasn’t been a fan of spray basting, having some chemical sensitivities, but now she wears a respirator to do the spraying and likes the results. She said that starching as well as pressing the quilt top and backing and pressing her batting made all the difference in reducing wrinkles and puckers in the quilting process. Gasp! I thought that was total anathema, as it would crush the batting pile, but I gave her process a go. Well you know, she’s right. So long as you don’t bang the iron down heavily in one place, but glide it lightly and use extra steam, the batting’s fine. And the starching makes a huge difference – it’s a game changer. Doing the extra steps is a bit more of a faff, but you get an almost inhumanly perfect and flat quilt sandwich. I mean, look at this:

Smooth, flat and taut, with not a pin or stitch in sight.

So anyway, I’ve made a decent start, and got a production line going. As always with my QAYG quilts, I’m going to wait till they’re all quilted, and then measure them all to find the smallest one, which will determine the trimmed out size for all the blocks. Some blocks came in at exactly 12.5 inches and some with extra, so I’ll see what the quilting does to the smallest and work from there.

Oh, and I need more spray baste, cream thread and a cream fabric for sashing the back, but how much of the latter I don’t know. I seem to have lost my piece of paper with all the size calculations, drat it. Quilt math, my least favourite part of the exercise.

I feel better now that I’ve actually got some quilting done. The job has been cut down to a manageable size 🙂

ST&D: a first

Hello again, with the latest report from Signed, Tealed & Delivered.

This beautiful block arrived today from the lovely Sandra in the UK. She’s created a postcard block with the view from an old family home of hers, showing one of England’s many White Horses. These White Horse images are vast, carved out of the thin turf covering chalk downland, and some of them are very ancient indeed. This is Sandra’s first ever appliqué quilt block, and I’d like to congratulate her on the imaginative image and the beautifully neat job she’s made of it. I must also draw your attention to the background fabric, which she decorated herself; it’s not, as most would imagine, a patterned fabric.

I’ll definitely be calling on Sandra again next time we have an OCA quilt in the pipeline 🙂

She also sent me some gifts, and these are also her work: the notecards are either her photo, or photos of images she’s created from natural and found objects. I love the pole dancer myself – I think she’s probably called Shelley, don’t you? And that Jaffa Cake keyring is a cute reminder of one of my most favourite bickies from the UK. You can’t get them fresh here; they import them but they’re horribly stale by the time they reach the specialist shops that stock them. Thank you, Sandra, they’re all lovely, and just in time for Christmas!

So, we’re just short of 4 blocks. Everyone has been exceptionally helpful about getting their work to me promptly, and I expect the final ones to come arrive in January or perhaps the end of this month. And then, ladies and gentlemen, it will be time to start arranging, sandwiching and quilting!

Meanwhile, it’s 32°C/90°F, humidity’s at 75%, and it’s time for a cold drink and a sit down!

ST&D: the other two corners

There was another squishy this morning.

The lovely Robin has sent me the other two corner blocks, beautifully made and exquisitely neat, and now I have to decide whether the envelope flaps will point inwards or outwards.

Here are Robin’s blocks, intended for the two bottom corners:

And here’s the layout, from my last post.

I’d designed it so the flaps pointed inwards, on the 4 diagonals. But one of the comments on the last ST&D post was to the effect that it might look better if they pointed outwards.

What does the audience think? All comments gratefully received, but you know me, I’ll go with my own thoughts in the end.

Ladies, we’re doing brilliantly well. Just 4 blocks to go… (some of which are already on their way).

Signed, Tealed & Delivered: the gappy one…

Well, people, you asked for it.

Here’s the ‘gappy’ layout, showing the blocks I have in so far. We’re still missing two corner blocks, three postcards and an embroidered postal frank block (for a look at this, go over to Margaret’s recent post about it). The gaps in the layout aren’t necessarily where the outstanding blocks will go in the end, but I wanted to make the layout looks as complete as possible.

This really is a wonderful collection of beautiful blocks, and I’m thrilled at how close to the original concept we’re going to come in the end. Everyone who’s contributed has dug deep in their stashes to donate some truly lovely fabrics, all of which contribute to how impressive and gorgeous this quilt will be when it’s done.

I’ll show the outstanding blocks as they come in. I think the corners will be next, then one of the postcards, then the frank block and the last postcard, judging by where they’re coming from.

All too soon, it’ll be time to start quilting…

ST&D: a surprise squishy!

I didn’t know this one was coming, so it was an especially lovely surprise to find an envelope in the mail box this morning 🙂

Jenny from The Lilac Cat has made two really beautiful envelopes. I love the fabrics she’s selected, especially the ones on the lighter of the two – the envelope itself is my particular favourite.

We are now waiting for just four more blocks: Robin’s corner blocks, which are on the way, Sandra’s postcard, also on the way, Margaret’s embroidered ‘frank’ block, in progress, and Esther’s postcard block, also in progress. You’ve all done so well, dear contributors, and Signed, Tealed & Delivered will be done before you know it.

I’m almost at the point where I can post a layout. Maybe I’ll do a ‘gappy’ one in the next week or so…


ST&D: a squishy from Kathy

Another exciting parcel in my mailbox.


These two lovely blocks are from Kathy, one dark envelope and one light. We’re up to 17 blocks, which means we’ve tipped over the halfway point, hurray.

I’d start quilting now, except I need to wait till all the blocks are in. This is because I need to measure them all and see which is the smallest. Once I have that information, I can trim them all out to the same size so everything lines up properly. And of course, I can’t finalise the layout till I have them all; colour balance can make such a difference, which is why I’m not showing you anything like that yet.

I wonder whose blocks will be next…. 🙂