Verité #2

And here’s the next one.

This is the Arkansas Traveller block. I made the diamond centres first, and then used them as a single piece when I paper pieced the rest. I love how it turned out 🙂

Don’t you love how it looks like juicy orange segments? I think there may be one more, and then I’ll stop till it’s finally time for the whole F2F group to send out their blocks. Verité will sleep peacefully till then…

Meanwhile, I have other things on my mind. And chocolate to eat.

Wish me luck for tomorrow’s gadolinium injection and MRI 😦

Scinteallate #6: a meteor shower

EIGHT more stars have fallen into my mailbox.

I think that qualifies as a meteor shower, don’t you? It  means we’re up to 18 stars for Scinteallate, only 7 left to go till there are enough to start quilting and assembling. Good work, everyone!

These are the latest contributors.

Robin (her third block for this quilt)

Lynn (don’t you love that animal fabric?)

Sharon

Kerry

All gorgeous, aren’t they?  I love the range of styles and designs, and I’m flat-out impressed by Sharon’s immaculately hand-pieced block! For those of you concerned about the background cream, don’t be; we need a bit of variation to add definition and individuality with these lovely blocks.

Finally, here’s how they’re looking together on the design wall so far. This is by no means the final layout (unless it turns out to be the best arrangement, of course!), but I’m liking how it looks as a grouping.

I really must crack on with a few more blocks of my own; there’s been a paper piecing pattern and fabric scraps sitting on my table since before we went away.

But first, the laundry 😦

Scinteallate #3: Back in the swing

I’ve got my paper piecing mojo back.

Every time I don’t do it for a while, I lose the tricks and habits that make this such a great technique for accurate piecing. I start to think it’s too much trouble to make templates of the pieces I need. I forget to adjust the stitch length down. I forget that all-important mantra: Stitch, Flip, Check, Trim, Press. Then, out come the stitch ripper and tweezers and sweaty frustration…

But by the end of this block, I was back in the swing. I didn’t have to take anything apart, the paper came off the back with very little resistance, things lined up as they should, and I’m facing the next one with equanimity, despite the fact that it has 64 pieces! Yup. You read that right. Thing is, they’re almost all rectangles of the same width, just slightly differing lengths. As they say in these parts “She’ll be right, mate”. I’ve got this.

So, this is my Scinteallate block No. 2. En route already are several more from Robin, Gun and Sue, and a further 12 more are in progress from other lovely contributors.

I think the Twinkle Factor is improving rapidly, don’t you?


Let there be light…

… and behold, there WAS light!

Let me start by saying I didn’t just hold out my hand and say the words, I went shopping for it! I’ve long found the light on my sewing machine a bit feeble and yellowish. I tried an LED bulb instead of the incandescent one it came with, but something about the frequency made it flicker in a very headache-inducing way. The light was great, but not at that cost. I searched the shops for an LED strip I could plug in, but they all came as separate strips to which you had to solder a connector and then a power cord and adaptor. I could, but I wasn’t going to; there had to be an easier way. Today, while shopping for something else, of which more later, I found a small box with a home-made label on it, bearing the legend ‘LED light strip for sewing machine’. Below was a photo – and it was all cabled up. Not cheap, but perfect for what I need. The brilliant Ray of Needleworx (‘The Hardware Store for Ladies!’) had made several of these up, and had sold them all in a matter of days.

Here’s the difference: Top, normal light only; Bottom, with LED strip

I was actually in there because my light pad had died. The connection between cable and pad had give up the ghost, and 9 times out of 10 the touch-switch for turning it on wouldn’t work without endless jiggling. I find it invaluable for paper piecing, and Ray had just sent me an email to say the Triumph A4 light pads were now a good $150 cheaper than when they first came out. Well, you can’t ignore a bit of serendipity like that, can you? The photos show the same piece of paper on the light pad; Top, with the pad off, Bottom, with the pad on. You can see it’d make paper piecing a whole lot easier… (and for those still looking vaguely puzzled, you sew the fabric onto the back of the paper, but the design is marked on the front, so seeing the lines through the paper really, really helps!).

So now I have a working light pad too, which turns on first time, every time, is bright as day, is thinner and lighter than the old one, and has just eliminated my last possible excuse for not getting on with the paper piecing of teal star blocks for the Scinteallate quilt.

How deLIGHTful…

ITAA: Happy Things

Two more cornerstone blocks in today 🙂

Lynn has made two of the cornerstones I need for the quilt.

You may recall that these cornerstones represent things which made Trudy happy. There’s the Trudy Crowley Foundation she initiated and set up, her work for Ovarian Cancer, her family and friends, a glass of bubbly, the pretty shoes she adored, and the beach, her happy place. So we have the TCF logo, the ovarian cancer ribbon, a heart to represent the ones she loved, a shell for the beach, a fabulous high-heeled shoe and a glass of bubbly.

I’ve done the TCF logo and the ribbon, Lynn has made the shoe and the glass, Sue has made the heart and Margaret has made the shell; the two last are on their way so I can’t show them yet.

Paper pieced pattern ©2018 Kate Chiconi

Paper pieced pattern © Maartje Quilts in Amsterdam

The shoe pattern is available free on the internet, and if you want the glass, just email me, I’m happy to send you a scan of my hand-drawn pattern.

I’ve also made a few extra blocks for the background and border, in case blocks on their way don’t arrive in time for me to start assembling, quilting and bordering. Rest assured that anything that arrives after that time will find a home in future quilts, so your work hasn’t been wasted. With the house move going ahead, my time is so tight now that I may need to make these difficult decisions, so I hope anyone affected will forgive me. I’m not showing the blocks I’ve made, as I’m still hoping they won’t be needed. Also, I’m still waiting to hear from the embroiderers about whether they can do the banner. I’ve virtually resigned myself to having to cut out and place each letter individually using iron-on transfers. That’d be fine, but embroidery would look a bit nicer and save me some time. Fingers crossed…

So, some progress. I hope that in the next few days I’ll receive the shell and a background block from Margaret – I’m looking forward to seeing the shell she’s made using appliqué, it should be lovely!

While I wait, I should look at some F²F³ blocks too, don’t you think…?

Lovely Liberty Lepidoptera

Sorry, sorry, couldn’t resist…

This awesome, beautiful, creative and generally splendiferous piece of work is not the work of my hands. These delicate paper-pieced butterflies and their companion squares are the work of Cath Hall of Wombat Quilts. And this quilt is now mine!

Cath and I share a love of and obsession with Liberty Tana Lawn. She’s an Aussie now married and living in Portland, Oregon, but she’s a Queensland girl originally, and she buys her Liberty stash from Ava & Neve in Brisbane. She asked if I’d mind her lending this quilt to Ava & Neve for their stand at the Brisbane Quilt & Craft Fair back in October, since they supplied her with the fabrics. Well, I said yes, of course. And now this gorgeous snuggly, soft and beautifully colourful quilt has found its way home to me.

It’s currently sitting under our very tropical Christmas tree, on proud display (but I’m willing to bet it’ll be around my shoulders later tonight when the aircon gets a bit too draughty on my bare shoulders).

I was about to take it outside to hang on the clothesline to be photographed and then it started to rain. Well, this is the Wet season in the tropics… And I didn’t want to create the false impression that it was my work, so a nice bit of informal draping indoors will do just fine. Do go over to Cath’s blog and admire her gorgeous quilts – be sure to take a look at her library of free paper piecing patterns, too. Many of them are her original work and quite beautiful. She also does heaps of work for Project Linus, too, and gives away almost everything she makes.

You’ll have to excuse me. I have to go and pet my quilt a bit more…

ST&D: Till minne av vår mamma

Today, I received Gun’s squishy envelope for the Signed, Tealed & Delivered quilt.

She’s made three beautiful blocks, two envelopes and a postcard. With it, there was a lovely letter, and I don’t mind telling you it made me cry a bit. Let me tell you why.

This quilt is dedicated to Barbro, Gun’s mother, whom she and her sister Monica lost to ovarian cancer in 2009. So you see, Gun also has a special reason to work on the quilts for Ovarian Cancer Australia.

In her letter, Gun explained that her mama had loved bluebells, so she was delighted to find a paper piecing design of bluebells, which she carefully scaled down for the front of the postcard. The back of her postcard is beautifully embroidered with a Swedish stamp and a special message, which translates to read:

Love you, miss you   |   In memory
Gun and Monica        |   of our Mamma

I’m honoured to be working with such a special piece of creative work, and to dedicate this quilt to a mother who was so greatly loved and is so greatly missed.

För Barbro: till minne av vår mamma…  

In honour of all our mothers, and loved ones lost.


ST&D: another squishy!

I do love getting those nice fat envelopes in the mail.

On Friday, it was this lovely envelope block for Signed, Tealed & Delivered from Carla. She has the most enviable fabric collection – those gorgeous cats on the envelope lining fabric make me smile!

I’m going to try and get my last postcard block done this week – and don’t forget, if you’ve agreed to make a block or two but are running out of time or life is dishing up a large serve of busy, let me know and I’ll fill in for you.

That’s seven blocks up on the design wall now, and I know more are on their way 🙂 We’re looking good!

ST&D: Some clarification

Hello, wonderful Ovarian Cancer Quiltmakers.

Some of you made an early start with Signed, Tealed & Delivered (ST&D) and have highlighted something that’s not clear – thank you for the heads-up, and here’s an explanation.

If you print out the 4 pieces of the paper pattern for the envelope block created by The Littlest Thistle and join it together, it’s all in one piece. However, it needs to be separated into two parts to work. The photo below shows how you should reassemble the paper pattern to make things easy. The numbers showing the order of assembly are then much easier to understand.

If you print the pattern twice (at 100%, don’t forget, not to scale), you should have enough spare parts to create the full pieces in both sections. If you click on the image above, you’ll see where I have stuck pieces together with a glue stick. Remember to allow a seam allowance to join the top section to the bottom.

Another question I’ve been asked is whether the envelopes have to be plain and light coloured. The answer is no. If you want to make the envelope dark and the lining light, then do. If you want to make the background dark and the envelope light, feel free. All you need to do is ensure there’s some contrast. The envelope can be patterned or plain, same for the background and envelope lining. Have fun!

In the next few days I’ll be making my first postcard block and will post it so you can see the sort of thing I intend for it. I’ll be making an appliqué version, but if you want to piece them that’ll be fine too.

Have a great weekend, y’all.


Signed, Tealed & Delivered: Ready, set…. go!

And here we are again. Time for another Ovarian Cancer donation quilt.

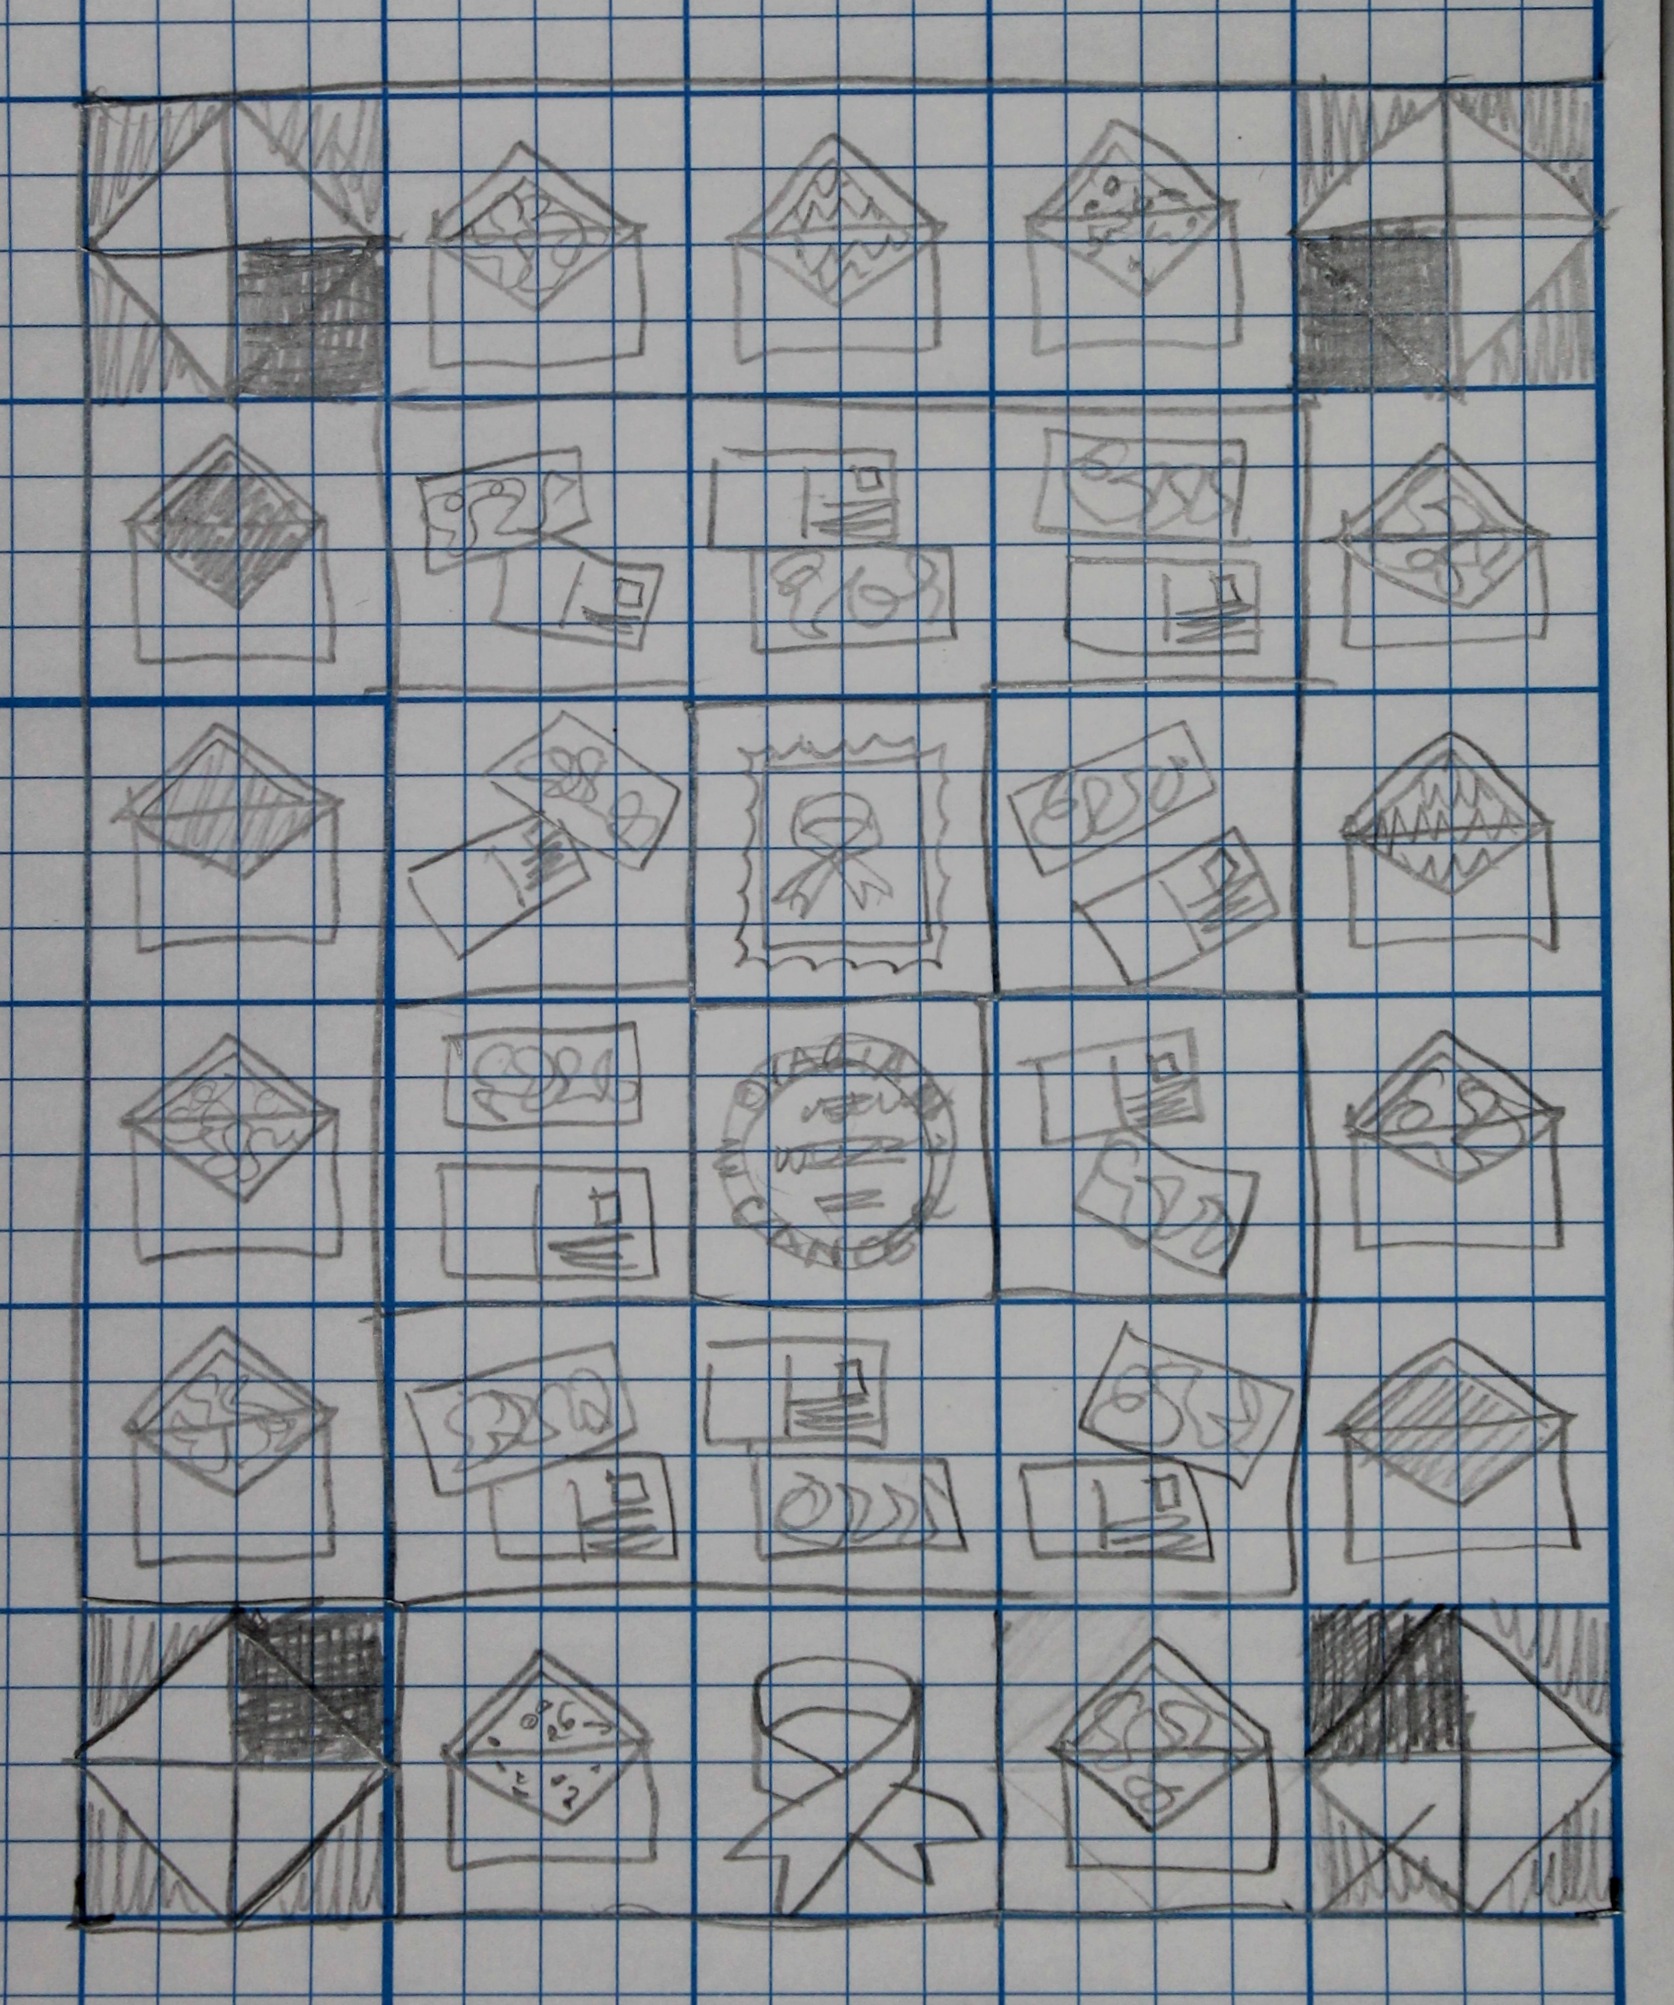
Signed, Tealed & Delivered has a postal theme, as you can see from the original sketch I showed some months ago. The response to my call for block contributors has been outstanding, and I will be emailing everyone who volunteered with confirmation of what they’re making, attaching a pattern if necessary.

As always, the colour scheme is based around various shades of teal and cream, in 100% cotton quilting weight fabrics. However, with this quilt, I’m encouraging the use of other colours in the envelope linings and postcard fronts, to ensure this quilt is lively, colourful and varied. Pink, apricot, orange, emerald, dark blue and lilac are all possible additions.

As you know, there’s a paper piecing pattern for the ‘lined envelope’ blocks, and it’s pretty simple, so shouldn’t present too many difficulties. The ‘postcard’ blocks can be pieced or appliqué (personally, I’ll be using appliqué), and as you can see, there’s a postcard front and a back on each block. I think it would be a lovely idea to put your name on the address portion of the postcard back but not, of course, your address! It could be permanent marker, embroidery, etc. If anyone would prefer not to do this, let me know and I’ll let the others know that it’s not happening, so the blocks are all consistent. How you achieve the postcard is completely up to you, but if you need ideas, I’m happy to offer suggestions. Email me!

The four large envelope blocks in the corners can be achieved with simple piecing of triangles. Finally, there are the centre blocks, the stamp, the frank and the OCA ribbon. I have a brave volunteer for embroidering the frank, and I’ll be doing the stamp and ribbon blocks myself. The binding will be in the ‘airmail’ stripe fabric I sourced previously. I’m not sure what colour the sashing will be this time; I’ll wait to see what the block layout looks like so I can check what colour the quilt is ‘asking’ for.

The sizing follows the previous quilts. The blocks will finish at 12 inches square, and I’d ask you to give me an unfinished block of AT LEAST 12½ inches square, preferably a bit larger if possible. This will ensure that when the blocks are quilted I still have plenty of leeway for trimming out.

Ideally, I’ll have all the blocks in by the end of January, to give me plenty of time to quilt and assemble (I think I need to do something a bit more elaborate than quilted wiggly lines this time!), so hopefully that’s enough time for everyone to get their block or two sorted out. I’ll be posting the incoming blocks as they arrive, to keep everyone’s creativity flowing.

So here we go. Time to start sorting out your teal-ish fabrics, fabulous OCA Quilt Volunteers 🙂